making a swift return…

Hello, hello, hello,

this feels rather odd, returning after such an extensive break. taking an extending break was due to intensive school studying and extra-curricular activity. It’s lovely to be back in my writing chair, tea in hand, rambling on to you about my foodie adventures.

This year, my cookery has taken a rather different approach, i’m personally trying to consume less dairy, meat and gluten, opting for a more healthier approach to living. my most recent purchase consisted of a Breville Smoothie Maker and a collection of lovely books; Hemsley & Hemsley, Eat. Nourish. Glow. and Nutrition (Glow from the inside out).

I wouldn’t want you all to fret, the butter-rich, voluptuous, cream filled cakes will still be steadily flowing, but I am aiming to keep this blog as fresh and vibrant as possible.

With the not so summery British Summer kicking in, it is about time to kick out the old studying habits of biscuits and tea and replace them with fresh and zingy salads, exciting smoothies and nourishing wholefoods.

So, hears to a another year of glorious blogging, health and happiness.. 🙂

R.

Italian Apple Cake.

Hello all, sorry for that delay in posting, this week has literally been Dante’s Inferno in action. Tonight’s post is all about that vanilla, cinnamon scented baking of Italy. This apple cake is fabulous served just above room temperature with a slosh of cold single cream, or at a desperate point in the afternoon when the only two things in this life that will solve the problem is a cup of Earl Grey and a slice of this cake. Personally, I never really liked Italian cakes as I assumed them to be dry and over baked, but I have been mistaken, I can’t survive without one now.. This cake is simply moist, cinnamon scented and toned with vanilla. It is certainly what you need on a cold ‘winters’ day. By winter I do mean it sincerely, Glasgow has taken a turn for the worse in terms of temperature, do not get me wrong, I do love a cold winters evening, or a brisk walk in the park on a Saturday morning before a cup of sunshine coffee. But you do feel that ever longing desire for the warm September sunsets.

INGREDIENTS:

85g unsalted butter, soft.

3 Granny Smith apples.

Juice and zest of 1 unwaxed lemon.

3 eggs.

150g golden caster sugar.

1 vanilla pod or few drops of extract or paste.

300g self raising flour.

METHOD:

Preheat the oven to gas mark 4 / 180 C. Grease and line a cake pan (20cm) with  greaseproof paper.

Peel, core and chop the apples into 1cm chunks. Squeeze over the lemon juice and toss to prevent them from oxidising.

Whisk together, the sugar and eggs until light and fluffy. Add the butter and whisk in vigorously. Add the lemon and vanilla.

Sift in the flour, then switch to a spatula and fold in gently losing as little air as possible. Add the apples and fold through the mix, the juice from the apples should loosen the mixture a little.

Bake on the middle oven shelf for about 40 minutes or until golden in colour. Test in the centre and if the skewer comes out perfectly clean, then cake is ready. Leave to cool in the tin for about 10 minutes on a wire rack, then loosen the tin and remove and leave to cool until completely cold, or just above room temperature if serving as a pud.

Enjoy, thanks for reading,

Ryan!

IMG_1007.JPG

Chocolate Malteser Cake!

Hello all, how are we on this rather chilly, windy and rainy evening? Well I find myself inside in the cosy warmth, listening to Adam’s Lullaby sang by Natasha Atlas, whilst constructing the post for you. As you know and I as I have been mentioning over the past few weeks, posting has been rather static, and I do give you my sincere apologies. I’ll have another recipe for you tomorrow too!

Oh really do give that song a listen, it’s not everyone’s cup of tea, Arabic singing, but it is just lovely. Tonight’s recipe is a chocolate cake studded with Malteser chocolates and a cake and icing that have malt powder and chocolate in them to resemble the physical chocolates on the cake. It has a certain lightness about it and with next to no butter you feel no guilt whatsoever, going back and cutting another slice. It is a very aesthetically pleasing cake to look at, and you could pretend its for the kids, but we all know your secret…. its ok I won’t tell!

A slice of this cake and a cup of tea in hand, is all one needs on a cold, wet autumnal day, staring out at the bleak, opaque sky, watching the slowly dripping rain drops, slide off the window pains. Tomorrows cake is even more spectacular when the colder nights are drawing in and the prospect of leaving the house is beyond the unimaginable. Just a little spontaneous side note, but I should let you know about a great composer (contemporary) named Alexander Desplat, he writes music for many feature films, including Harry Potter, The Kings Speech and Extremely Loud and Incredibly Close. The latter being one of my most recent discoveries and it is just a fantastic film that is well worth the watch, along with my newly discovered and new favourite TV series on BBC One, Our Girl. Check it out, it is really great and 100% must watch series!!!!

INGREDIENTS:

150g soft light brown sugar.

100g caster sugar.

3 eggs.

175ml whole milk.

15g butter.

2 tbsp Horlicks or Malt powder.

175g plain flour.

25g cocoa.

1 tsp baking powder.

1/2 tsp bicarbonate of soda.

For the Icing:

250g icing sugar.

1 tsp cocoa.

45g Horlicks or Malt powder.

2 tbsp boiling water.

125g soft unsalted butter.

120g Malteser chocolates.

METHOD:

Preheat the oven to gas mark 3 / 170C. Butter and line two sandwich tins and set aside.

Whisk together the sugars and eggs, until pale and lightly frothy. Heat the milk, Horlicks and butter in a pan until everything has melted, do not boil. When the eggs and sugar are ready, add the milk mixture.

Fold in the flour, baking powder, bicarbonate of soda and cocoa. Then spoon in the prepared tins and bake in the oven for 25 minutes, until a cake skewer comes out clean. Leave the cakes to cool in their tins for 5 minutes before turning out to cool completely on wire racks.

To make the icing, place the icing sugar, cocoa and Horlicks into a food processor and blitz until lump-free. Add the butter and blitz until clumpy and beginning to look like buttercream. you will need to add the water slowly until you reach a smooth spreadable consistency. I found I required the full two tablespoons.

Once the cakes are completely cool, place the uglier sponge on the base and spread thickly with a generous amount of the buttercream. Then place the other sponge on top and ice the top surface. Stud the outside surface with Malteser chocolate and serve.

Enjoy, and see you all soon!

Ryan!


Peanut and Pretzel Blondies!

Hello everyone! What a lovely sunny Sunday afternoon to be sitting here writing this post, which funnily enough ties in with the theme of sunshine. Tonight’s recipe is one in which I had only discovered two nights ago whilst scrolling through copies amounts of recipes online. This one in particular comes from an issue of bon appetite magazine, and is truly scrumptious. I tell you now the result you get from the Blondie part is just unbelievable, the chew is just perfect. I wouldn’t mind chucking in a handful of chocolate chips and dusting of cocoa to turn them into brownies, the British counterpart.

The peanut and pretzel combination take there form in a soft almost soft set caramel, enriched with butter, cream and honey. The honey sort of adds a soft grainy texture to the caramel, which I just love. These are also best served at room temperature. As with the pretzel part, I could only find the stick like pretzels, not the wound up German kind that the recipe specifies, but we don’t all have time in this life to find exactly what we need, so just settle for whatever you can find, as long as they are salted. The peanuts required here must be unsalted.

INGREDIENTS:

Sorry folks I will have to give you the ingredients in cups and spoons measure.

For the Blondie:

1 1/2 cups plain flour.

2 tsp baking powder.

1 tsp table/kosher salt.

3/4 cup unsalted butter.

2 cups light brown sugar.

2 eggs.

1 tsp vanilla extract (optional).

For the peanut-pretzel caramel:

4 cups unsalted peanuts.

2 cups caster sugar.

1/4 cup runny honey.

1/4 cup unsalted butter.

1/2 cup double/heavy cream.

1 1/2 cups salted twisted or crumbled pretzels.

METHOD:

Preheat the oven to 180C / Gas Mark 4. Line a rectangular brownie pan with baking paper and leave a 1 inch overhang for easy removal later.

Whisk the flour, baking powder and salt In a medium bowl; set aside.

Stir the butter in a medium saucepan for 7-8 minutes until it turns a light golden nutty colour and the milk solids float on the surface. Transfer to a medium bowl.

Stir in the brown sugar, until you form a mixture that resembles wet sand. Add the eggs and optional vanilla; beat until fluffy and well combined. Beat in the dry ingredients and using a spatula spread the mix evenly in the tin. The mix will be very stiff.

Bake the Blondie for 20-25 minutes or until it is golden brown, edges are pulling away from the sides of the pan a few crumbs stick to the cake tester. You want these to be fudgy and gooey not as dry as a biscuit.

Transfer to a wire rack and leave the pan to cool completely. They will sink and will quite a bit, do not panic.

Preheat the oven to the above temperature again and line a baking sheet with baking paper and spread over the peanuts. Bake evenly by tossing every few minutes for about 5-7. When fragrant, set aside.

Stir the sugar and 1/2 cup of water in a large saucepan, over a medium-low heat until the sugar dissolves. Increase the heat and boil without stirring, swirling is permitted. Boil until it is a deep amber colour, about 12-15 minutes. Add the honey and stir quickly to incorporate. Add the butter and stir for a minute until blended. Then add the cream and stir standing back as you don’t want a 100+ Celsius facial.

Stir in the peanuts and pretzels. Pour over the cooled Blondie and leave for 5 minutes to cool, before placing in the fridge for 30 minutes.

Run a knife round the sides of the pan to release. Cut in to bars and eat!

Enjoy,

Ryan! Comments are welcome 🙂


Crouching Tiger, Hidden Zebra Cake

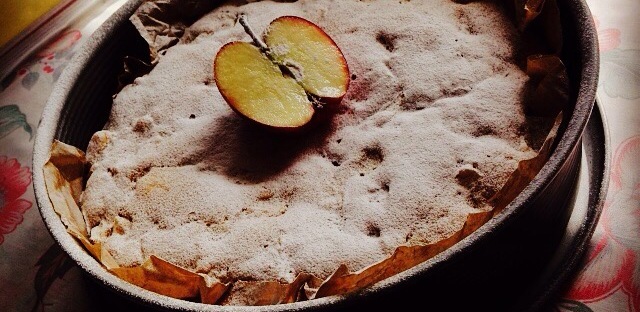
Hello folks, I’m back, yes I know its been a while and it’ll probably be like this for a while, but my plan to keep this up is to do a post as soon as the daily homework ordeal is over and I can just get the kettle on and settle down to some writing. I must admit I do miss sitting in front of the laptop, with tea in the left hand and cake in the other. Oh and I can’t forget the music flowing through my ears, that’s really what depicts what I write.

So these past few days have been spent on Amazon, trying to source the little bits and bobs required for when Christmas arrives. I know you must all be sitting there going ‘why on earth is he sitting there typing about Christmas, when I haven’t even bought birthday presents yet’, there is logic in my response. I am not one of those people who leave everything to the very last minute, infact it’s like a have an inner compulsion to complete tasks well before they are needed. Basically I like to stock up my cupboards with all the little things, such as preserving jars, ribbons, cards, wrapping paper, cellophane bags (we will come onto these In a later post) and spices. The truth is, all year long these items stay at next to nothing prices, and so when Christmas comes around Amazon shoot the prices up to gain more profit. If you buy it all now or in the next few coming weeks then you are likely to save yourself a fortune in the long run. After all, by the end of the festive period, wallets are bone dry, in need of fresh money to repay for all the over expenses spent at that time of year, but hey its Christmas and its all about having fun and letting down your frontal guard, giving into temptation.

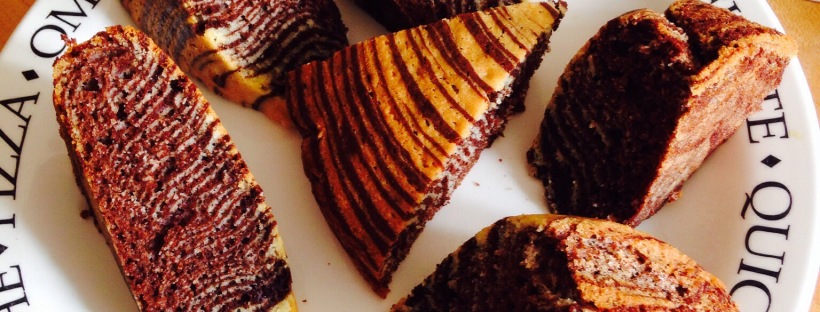
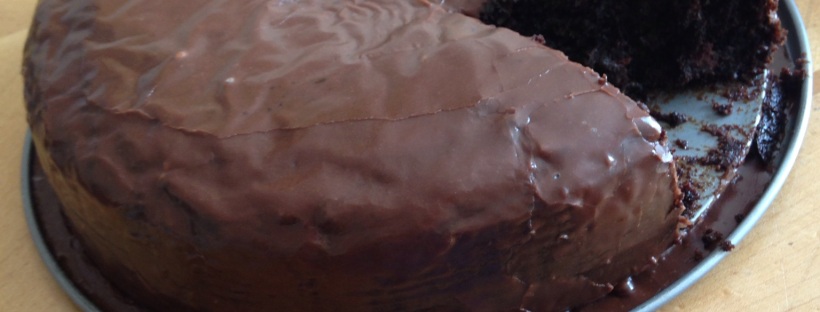
Tonight’s post is all about letting your hair down and having a little fun in the kitchen. This recipe is courtesy of Lorraine Pascale and her wonderful book, fast, fresh and easy. I love the fun in making this cake and it’s simply beautiful to look at when sliced. It never fails to please me when people always comment saying ‘wow, you made that? No surely not’. Its a real comfort to know that baking is not a complicated science at all. You just need to ensure you have a cup of tea at the ready, a good set of digital scales and some simple logic. I love the amber concentric circles interlaced with dark brown circles in this cake. It bakes a real treat and requires no faff.

The great thing is that it doesn’t require you to be able to handle using a piping bag, after all when the daily stresses are kicking in, the last thing you want to be handling is a piping bag. You simply divide the mixture in half, make one lemon and one chocolate orange, take spoonful’s and blob on top of each other, simples.

INGREDIENTS:

250ml vegetable/sunflower oil.

250g caster sugar.

100ml semi-skimmed milk.

4 medium eggs.

a few drops lemon oil.

300g self-raising flour.

1 tsp baking powder.

25g cocoa powder.

1 orange.

METHOD:

Preheat the oven to 180c/gas 4. Grease the bottom of a sandwich tin with a little oil. Line with paper and oil the paper lightly. Set aside.

Put the oil, sugar, milk, eggs, and lemon in to a large bowl and combine. No need to whisk vigorous amounts of air in here.

Pour of 400ml of this mixture into a medium bowl. Sift in 175g of the flour into this bowl along with 1/2 tsp of the baking powder. Mix well and leave aside. This is your lemon mix.

Sift the reaming 125g and the other 1/2 tsp baking powder into the remaining oil mixture along with the 25g of cocoa powder, and the zest of the orange. Combine well and set aside, this is your chocolate mix.

Now, put a tablespoon of the lemon mix in the middle of the sandwich tin. Then using a clean tablespoon add a blob of chocolate to the mix, on top of the vanilla. Keep alternating the to mixes until the spread out to the edges of the pan and you can clearly see the bulls eye target look.

Bake in the oven for 35 minutes.

Check the cakes are ready by piercing the centre with a skewer, if it comes out clean cakes are ready. If not then pop back in for another 5 minutes.

Take the cake out of the oven and place the tin onto a wire rack. Leave to coo for 5 minutes then turn out on the wire rack and leave to cool completely.

Cut into wedges and serve with a cup of tea, i.e when blogging hehe!

Enjoy, thanks for reading,

Ryan! 🙂


Sea Salted Caramels

Hello everyone I’m so truly sorry for not posting in over a week and a half. Its those gold standard of Scottish education Highers that are killing me within. I have this post for you this evening, and apologies for the rather terrible layout of the posts I just bought my new laptop yesterday. The Microsoft surface pro 3, so far its excellent and superbly fast. This post features a recipe I received from a friend of mine who blogs in France. These salted caramels are among the best I have ever tried, extremely chewy and smooth on the palette. I have a real true love for the salty/sweet combo, whether it be sweet and salty peanuts dusted with chilli or salted caramel in general.

I like to imagine at some point in my life I will be sitting in a Brittany café sipping elderflower presse and eating Brittany sea salted caramels. Of course this is all just an ideology but bring a tray of these out on a cool September evening after dinner and absorb the last of the rays of amber sunlight chewing on smooth buttery, creamy candies.

INGREDIENTS:

175g golden syrup

100ml water

600g caster sugar

225g unsalted butter

450ml whipping cream

Fleur de Sel For sprinkling

METHOD:

Put the water, sugar and golden syrup into a saucepan (large) and I mean large. It will bubble over if the pan is to small.

Bring to a boil over a high heat. When the boil is achieved add the butter and cream and stand back. (avoid a facial at 121°C at all costs).

Let it come to the boil again and then reduce the heat to a medium low and stick in a sugar thermometer and let the caramel reach 121°c. Do not be under this or over you want it exact.

Whilst the caramel is reaching this temperature, oil and line a brownie pan.

When the caramel reaches the required temperature pour straight into the tin.

Leave to set for 1 minute, then sprinkle on some Maldon sea salt or fleur de sel.

Now leave to set fully out of the fridge overnight or you may be able to eat then 4-5 hours later.

Thanks for reading,

Ryan!


Chocolate Gingerbread!

Sorry everybody for the lack of posting, theses highers are rather time consuming. You may begin to see that this distant posting may become regularm, apologies in advance. Anyway I hope we are all very well! I’m not liking this new wordpress layout very much though, I don’t adjust to changes as quickly as some others.

Today I have decided to share with you a recipe that I just had to try out at the weekend, Chocolate Gingerbread, I mean who would have thought eh? the combination of the dark fudgy, earthy cocoa compliments the rich, wintery wamrth of ginger, but it does and so be it! This gingerbread was a bit to cake like and moist for my liking although this weekend I shall be trying a damp sticky Jamican version and also some sea salted caramels.

Hope you enjoy this one, perfect with a cuppa late afternoon:

INGREDIENTS:

For the cake,
200g black treacle.
200g golden syrup.
175g unsalted butter.
175g light brown muscavado sugar.
1 tsp ground cinnamon.
2 tsp ground ginger.
1/4 tsp ground cloves.
1 1/4 tsp bicarbonate of soda.
2 tbsp water, warm.
250ml milk.
2 eggs.
275g plain flour.
40g cocoa.

For the icing,
250g sieved icing sugar.
1 tbsp cocoa.
30g butter.
60ml ginger ale.

METHOD:

Preheat the oven to gas 3 / 160 C.
line a brownie tin with parchment paper.
Place the butter, sugar, golden syrup, black treacle, cinnamon, ginger and cloves into a pan. Melt slowly over a low heat.
Remove from the heat and beat in the eggs one at a time. followed by the milk, and the bicarbonate (mixed with the water). Now fold in the flour and cocoa (sift them together).
Pour into the lined tin and bake for about 45 mins.
When springy on top and a cake tester comes out clean remove from the oven. Cool on a wire rack.
Make the icing by heating the cocoa, butter and ginger ale in a pan before turning off the heat and beating in the icing sugar.
Pour over the gingerbread and once set, cut into slices and serve.

Enjoy,
Ryan!

Italian Roast Chicken with Peppers and Olives!

Hello again folks, this is officialy the start of my 5th year education, woohoo! Stressing already, but that is not what I’m here to share with you this evening, infact it is entirely the oppposite. I am here to tell you about the fabulous roast chicken I made yesterday for my lunch!  Superb, really fast and easy. Well I say fast (1hr) but it is minimum effort and yields maximum flavour. The lemony roast chicken with rosemary and soft fleshy leeks is just wonderful when served with the peppers and olives tumbled into the pan. This is my kind of cooking, one pan, wonders. Here it is for you to enjoy, and we must give thanks to Nigella for this wonderful recipe!!

INGREDIENTS:

1.5kg Cornfed chicken, organic and without giblets.

1 lemon, halved.

4 sprigs rosemary.

60ml olive oil.

salt and pepper to taste.

2 red peppers.

1 orange pepper.

1 yellow pepper.

3 leeks, trimmed,  each cut into 3 logs, then halved down the middle.

100g pitted black olives.

METHOD:

Turn the oven on to gas 6 / 200 C.

Take a roasting pan and add all of the veg and oilves to the pan. drizzle over some of the oil and pepper. NO salt as that will encourage the water to leak out the veg, we want the roasted not braised. add two of the sprigs of rosemary to the veg.

Toss to coat everything. Now take the chicken and pop the two lemon halves into the cavity along with the remaining sprigs of rosemary. Drizzle the chicken with the rest of the olive oil. Dust with salt and pepper and pop into the oven for 1 hour, until the juices run clear from the thickest part of the chicken, the thigh area.

Remove the chicken from the pan and leave to reast for 10 mins on a carving board covered with tin foil.

Return the veg to the oven for 10 mins, turning the oven off when they are placed inside.

Cut the chicken however you like and tumble the entire tray of veg on to a platter and dot the chicken in and around.

Enjoy!

Thanks for reading,
Ryan.


End of Summer… Spanish Omelette

Hello there everyone, apologies for the lack of posting these past four days, I have been pretty busy out and about and getting everything ready for returning back to school tomorrow, which honestly I am truly not looking forward to.  Although I am grateful that my life will be restored in terms that I’ll have my routine back.

Yesterday was a rather bleak day of non-stop rain. I also faced the realms of shopping with my mum, which 98% of the time ends up us being so drained of energy and almost fainting, dreaming of food. Last night was no exception, and so as soon as we had arrived home we heated up the omelette pan and threw together one of my favourite Nigella recipes, her Spanish Omelette. Wonderfully light but filling, packed with roasted peppers and potatoes. I add a few extra ingredients that Nigella doesn’t use but anyway that’s what you should be doing in the kitchen, mixing things up, creating new spins on old classics or modern creations.

I also treated myself to a bottle of Molton Brown London’s Orange and Bergamot Enriching Hand Lotion yesterday. It is just utterly amazing, I have used two applications, and I can already see the difference, for a person that suffers from dry hands this product is a godsend. It is a tad pricey, a 300ml bottle comes in at ÂŁ20. Well worth the expense!

INGREDIENTS:

225g baby new potatoes, halved.

4 eggs.

75g jar of flamed roasted peppers.

3 spring onions, finely sliced.

75g grated cheddar cheese.

1 tsp butter.

few drips of oil.

salt and pepper.

1 small red chilli, deseeded and chopped finely.

1/2 tsp sweet paprika.

METHOD:

Turn on the grill and let it heat up while you prepare the omelette.

Place the potatoes in a saucepan and boil in salted water for 15 mins, until cooked through. Drain and set aside.

Take the eggs and crack into a bowl add all the other ingredients apart from the butter and oil.

Add the potatoes to the mix and set aside.

Add the butter and oil to a small heavy frying pan. Add the omelette mix and cook for 5 mins. This will set the bottom.

Place the pan under the grill for a few minutes to set the top and then tip out onto a serving board.

Cool slightly, then cut into thick wedges.

Enjoy,

Ryan!